Welcome to
On-Camera Video Tricks and TipsConnect with your audience & build trust with quick, simple face-to-face videos
Take One:
Set the Stage
The first step is to make sure you have the right tools to produce your videos, and we’re going to start with the simplest and cheapest options. In fact, we’ll start with what you already have. This is often sufficient for producing basic on-camera videos. Your videos don’t need to be slick or complex at all; this will give you a baseline, and then you can upgrade as needed.
In this module, we’ll discuss cameras, microphones, lighting, and other gear. Editing software will be discussed in a later module.
What’s important to understand about a brand is that it has nothing to do with the actual product. It exists in the minds of customers only. As mentioned in the definition, a brand is a perceived image.
Brands are often confused with logos and identities. A brand identity consists of the image or design motifs. The logo is just one design that communicates the brand. Both are involved in communicating the brand’s message, but a brand is much bigger and more encompassing than that. It also includes the images or feelings that the design or logo invokes.
In his definition, Godin mentions ‘value.’ The importance of a brand is that it offers a unique perceived value that a customer doesn’t get from your competitors. In other words, the brand is the reason your customers choose you. A good brand tells customer that this is not only the best choice for them, but the only choice that offers the unique solution they’re looking for.
From the point of view of your business, your brand is the promise you make to your customers. It precedes and underlies all of your marketing and, if done well, every contact the customer has with your company.
Your Video Camera
First, let’s consider some easy options that you already have. One is to use your PC’s webcam. There’s nothing wrong with this and many businesses use it for their on-camera videos.
The obvious advantage is that your webcam is already set-up and ready to go, and you have built-in software already for recording and editing that came with your computer. Before you invest in anything higher-tech, it’s a good idea to try creating a video with your webcam to test the quality. See how it looks and see if it’s something you can use.
The disadvantage, of course, is the quality. Your webcam offers the worst quality of any of the options we’ll discuss here. However, there are some ways you can boost the quality and perhaps get a decent video out of it. One way is to invest in a better webcam that you attach to your computer. You can buy a good webcam for under $100. This can be enough to turn your webcam video into something slicker and far more professional.
You can also augment your webcam by investing in better lighting and a better microphone. The best strategy is to do some trial recordings with the built-in webcam and then see what’s lacking. For example, you might find that the video looks great but the sound needs improvement.
Your Smartphone
Another option is to record on your smartphone. Believe it or not I only use my phone. Many of the videos you see on YouTube are recorded on smartphones and modern smartphones offer excellent sound and audio quality. One of the great things about smartphones is that you can record anywhere. Whenever you have an idea, you can whip out your phone and start talking. With a little editing, this could produce a video you can use. There are apps you can use to edit so your video can be shot, edited, and uploaded with nothing but your phone.
The disadvantage of recording with a smartphone is that your video looks like it was recorded on a smartphone. Again, check out some videos on YouTube and you’ll quickly see which were recorded on a phone. You can mitigate this by actively trying to make it look like it wasn’t recorded on your phone. The best way to do this is to use a tripod. Mount your phone and you’ll cut down on the shakiness and accidental movements.
Pocket Camera
You should explore the above two options first. If your webcam or phone is sufficient, you’re ready to get started. But if you feel that you need to upgrade, either now or in the future, there are some options available that give you more flexibility, features, and professionalism.
Pocket cameras are small cameras that can shoot video. They’re also called “point and shoot” cameras. They offer better quality and more options than a smartphone, but are just as mobile and easy to use (hence the name “pocket camera”). The quality of pocket cameras has improved over the years so that those on the market today offer nearly professional quality.
The best way to find a good pocket camera is to go to a nearby shop and actually handle and try one out. Models that have gotten great reviews online in recent years include the Panasonic Lumix series ($500-700), Canon EOS Rebel T5i (about $600), and Canon PowerShot G9 X Mark II ($400-500).
Camcorder
Camcorders are bulkier, but capable of capturing better quality video than pocket cameras. Modern camcorders can shoot video that approaches professional quality. They come in all price ranges, but you can find one for just a couple hundred dollars. One major advantage over pocket cameras is that they have a great deal of memory.
Popular and reasonably priced models include the Canon Vixia HF series, the GoPro Hero4 Silver, and the Sony HDRCX240.
DSLR
DSLR cameras are the professional grade cameras that videographers use. They’re the most favored for all types of video production. DSLRs offer stunning clarity, excellent depth of field, a great number of options in terms of focus and shutter speed, various lenses, and long battery life. The disadvantages are the high cost and the size and bulk.
Nikon offers a range of entry-level DSLR cameras that retail for under $1,000 including the D3400, D5300, and D5500. There’s also the Canon EOS Rebel T7i and T6i,
Start with the free options covered here, and before buying anything check it out first. Read online reviews to make sure it offers what you’re looking for and if possible, try it out in an offline store. Keep in mind that you don’t need fancy features to produce excellent on-camera videos. If you upgrade and pay extra for features you don’t need, it’ll be a waste of money.
Another tip on shopping is to decide on your budget first, and then shop accordingly. For example, decide that you want a camera for under $400 that has a certain feature, and then stick to your budget and requirements.
Recording Software
If you have a camera, you’re ready to shoot. But if you already have some video editing software on your computer, you might consider using it instead of making additional purchases. Remember that the videos won’t be complex and won’t require a great deal of editing. Software programs that can be used for video editing include Camtasia, SnagIt, or the webcam software that comes with your computer. We’ll discuss editing options in more detail in a later module.
Microphones
Whatever camera option you choose, it will usually have its own microphone built in. If the quality sounds ok, try to use the microphone that comes with your camera so that you don’t have to spend extra money. The huge advantage of the internal mic is that it doesn’t require batteries or any extra gear, and it’s already ready to go. But your internal mic may not be suitable. Internal mics often product poor quality sound because they’re so omnidirectional. This means that it picks up all ambient sound and not just what you’re recording.
Again, create a video and listen to the sound. Once you hear it, you may realize it’s lacking and you need to upgrade. Compare your video’s sound to the sound of videos you find on YouTube and it’s easy to judge whether the quality is sufficient or not.
You can boost your PC or smartphone’s sound quality using an external mic. This is a cheaper option than upgrading to a better camera because of the sound. External mics can be attached to your computer or smartphone and are one of the first and easiest ways to improve the quality of your videos.
There are a number of mic types and which you should use depends on the specific use you have in mind for it. You should also consider connectivity. Make sure the external mic works with the device you’re using to record.
The main four types of mics used for on-camera videos are:
Desktop Mic – Best for webcam video, desktop mics typically connect to your PC or Laptop via USB connection. They’re the perfect option for recording at your desk as you won’t need to move them around, and can avoid shuffling noises as you speak directly into the mic without holding it.
Shotgun Mic – Shotgun mics are the long, thin mics you see on professional shoots. They’re useful because they’re very directional. They pick up the subject they’re aimed at and generally just enough ambient noise to make it natural but not distracting. A shotgun mic can be used at a distance to pick up someone speaking in a noisy environment.
Handheld Mic – A handheld mic is what you see reporters on TV using. These are easy to use and you can control what it picks up, pointing it at the speaker or sound you want to capture. It makes your videos look “newsy,” which could be an advantage or disadvantage, depending on what you’re aiming for. You have to speak directly into them, but you can control the direction easily.
Lapel Mic or Lavalier – These are the mics that you pin to a shirt. They’re especially useful when you’re moving around and don’t want to keep messing with the mic. They’re great for interviews. The only disadvantage is that they’re sometimes finicky and pick up random ambient noise (like the noise of the person’s clothes shuffling around).

Lighting
Lighting will have a huge effect on the quality of your video production. In fact, it can make a bigger difference than the camera you use or even the editing. You can use a lower quality camera but with the right lighting, get a great look. Lighting influences the mood, the shadows in the shot, how your subject looks, and how your subject feels.
First, try to choose a location for your videos that has good ambient light. Shooting outside or by a window with natural sunlight is often the best option if it’s possible. Good ambient lighting can be all you need to produce a good video. If it’s not, it’s a great start and a little extra lighting can be just enough to eliminate shadows and create a perfect shot.
When choosing a location for shooting, walk around with your camera and a friend to act as subject, and take still shots in different areas. Look at the still shots and you can determine what part of the space offers the best ambient lighting.
Three-Point Lighting
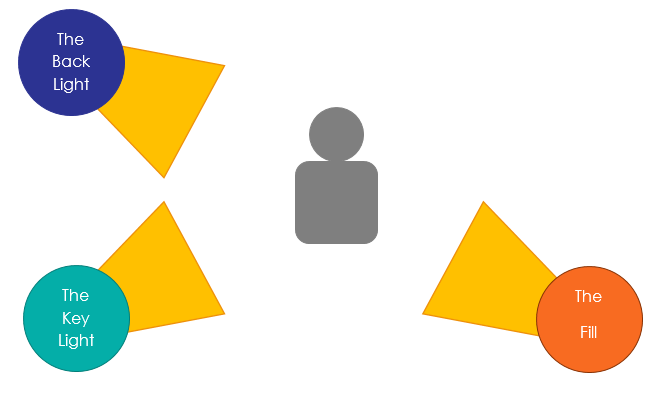
The most basic type of lighting is three-point lighting. As the name suggests, it uses three lights to control the scene: the key, the fill, and the back.
The key is the dominant light. It’s placed at about a 45-degree angle to the left or right of the subject. It’s positioned as though it were the only light, (but it isn’t). It casts light on your subject but creates deep and dark shadows.
The fill “fills in” for the key light. It’s placed in a similar way as the key light, but its purpose is to remove or lessen the shadows. It mirrors the key light but at a lower intensity. The fill is often placed on the other side as the key light. For example, if the key light is on the subject from the subject’s right, the fill will be placed to the left to minimize the shadows.
The back light is cast on the background, giving it depth and separating the subject from the background. It creates form and texture.
Three-point lighting is just one lighting scheme. It’s considered the most basic in video production. However, with the ambient lighting in the location you’ve chosen, you might find that you can get by with just a key light. If possible, it’s good to choose one particular place for most of your on-camera video production. You might choose one spot in your house or office where you have reliably consistent ambient light and you won’t need to change your lighting scheme each time.
Choosing Lights
When choosing lights, keep in mind that no one is ever going to watch your video and say, “Wow, they’re using XX lights!” Lighting has a very narrow purpose and you should buy the simplest, cheapest lights to accomplish this purpose. Basically, anything will do; but you have some options in terms of bulb types.
Halogen – Halogen is the most used because it burns intensely and provides soft, even light. Because a halogen light will burn so long, it’s economical. The disadvantage is that it requires more power than other lights and also heats up a great deal, so you have to let it cool down after use.
Incandescent – Your desk lamp uses incandescent lights. They can be yellow or white and aren’t terribly intense. They are cheap and use little energy, but burn out relatively quickly.
Fluorescent – Fluorescent lights use little energy and give off little heat. The tubes can be exchanged so that you can use one rig for multiple lighting options. Fluorescent lights provide a soft, even light
Other Gear
Stabilizer
You’ll probably want to buy a tripod or some other type of stabilizer to keep your camera steady. With a good stabilizer, you can get even your smartphone-shot videos to look steady and professional. Buy a stabilizer that’s appropriate for your camera and try to choose something light since you’ll be lugging it around. For example, a monopod is a simpler and quicker option than a tripod.
Boom Pole
A boom pole is the pole that you’ll have seen photographers on film shoots use. You can mount a microphone on the end of it and hold it so that the microphone is close to the subject even when you’re behind the camera. This is a good option if you’re using a shotgun mic.
Stock Mount
Depending on what type of microphone you’re using, you might need a stock mount. This is a mount that holds the microphone in place so that it doesn’t get bumped around and make extra noise.
Headphones
You’ll probably want a decent set of headphones. You need to hear what it sounds like as you playback and edit your video. You can’t necessarily fix everything, but it’s good to know where background noises are coming from so that you can avoid them in the future. Get a pair of headphones that cover your ears completely or a good set of ear buds.
Light Reflector
Although not a necessity, you might want a light reflector. A reflector allows you to control light and shadows more accurately. With a reflector, you can control the light without using so many lights. Instead of the three-point set-up, you maybe be able to get away with just the key light.
Batteries
You’ll need to make sure you have the power supply to run all of your various devices. It’s good to use batteries so that you don’t have to run cables everywhere. Make sure that you have extra batteries with you at all times so that running out of juice doesn’t derail a shoot that’s going well.
Bags
Finally, if you’re going to be doing on-camera video in different locations, spend the money and buy bags for each piece of video gear you buy. Bags make it much easier to transport and store your gear. Also, with good bags, your gear will last longer and cut down on costs and headache buying new equipment.

Setting up Shots
When setting up your shots, imagine a line going directly from your camera to the subject. Try to shoot subjects at eye level.
If you want to get creative, you can shoot downward or upward, but these dramatically change the feel of the shot. If you shoot downward at your subject, they’ll look smaller and they could look somewhat childlike. Shooting upward gives the subject an imposing look. At eye level, the subject looks natural and professional.
You should consider using a backdrop. If you have a backdrop, you don’t have to worry about the background of your shots. You’ll be in total control of it. The color of the backdrop has a great impact on the feel of the shot. White can be too bright and colors can be distracting. Grey is a good color to start with. You might want to purchase a few different backdrops for variety and so that you can switch them depending on the nature of the shoot.
Echo Control
You may want to have some soft household objects around to dampen the sound. If the room in which you’re shooting has a natural echo, some soft furniture, cushions, pillows, or even a mattress leaned against the wall can remove some of this echo.
Alternatively if you want to truly sound proof your space you can use canvas style pictures and add a bit of egg crate foam or even layers of terry cloth behind them, there are many DIY videos on YouTube that offer fast easy and inexpensive solutions to sound proofing a recording space.
Example – DIY Acoustic Panel
Activity:
- Keeping in mind the goal you’ve already outlined for your video content, use the worksheet to make a list of all of the equipment you already have that you can use right now, and others you don’t have for a wish list. The idea is to use what you have right now to get started.
- Think about what you want your audience to take away from your video. Using what you’ve learned in the module as guide lines, make notes as to how you think the set-up and lighting might influence what they think or feel.
Handouts and Planning Sheets

Tools list
ActionGuide
CheatSheet
Cracking the Rich Code
"Whether you’ve been stuck on the sidelines waiting for the “right time” to launch your business or struggling to “generate” the life changing results from your business- This is your time to start saying “YES” to opportunity and “NO” to the noise. 100% of us entrepreneurs need answers and solutions. Join me to get updated on what it takes to prepare yourself and stay ahead of this changing business world."

Our superpower is making you a superhero.